Patroni Cluster
In the world of modern data-driven applications, having a reliable and available database is a must. This is where Patroni and Spilo come into play. Patroni is an open-source solution for managing high-availability PostgreSQL clusters, and Spilo is a container image that combines PostgreSQL and Patroni, simplifying the deployment of fault-tolerant database setups. To achieve this resilience, Patroni leverages an external component that plays a critical role: a distributed configuration store. This component is responsible for storing the state of the cluster and for coordinating the actions of the different nodes. In this blog post, we will explore how to set up a Patroni cluster using Spilo and etcd as the distributed configuration store.
Prerequisites
Before we start, make sure you have followed the previous blog post on Building a High-Availibity etcd Cluster on AWS. We will use the etcd cluster we created there as the distributed configuration store for our Patroni cluster.
Setting up the Patroni cluster
We will use the Spilo image to set up our Patroni cluster. Spilo is a container image that combines PostgreSQL and Patroni, simplifying the deployment of fault-tolerant database setups. The Spilo image is based on the official PostgreSQL image and adds Patroni and WAL-E/WAL-G to it. WAL-E and WAL-G are tools that help with continuous archiving of PostgreSQL WAL files and base backups. They are used to implement the backup and restore functionality.
Since we are using Fedora CoreOS, we will create a Butane file to configure the Patroni cluster. The Butane file will contain the configuration for the Spilo image, including the configuration for the etcd cluster. The Butane file will be used to create an Ignition config, which will be used to provision the Patroni cluster.
Creating a rootless user for running the Spilo container
Here we are creating a user called “patroni-user”. This user will be used to run the Spilo container. This user is not attached to any group and therefore has no root privileges.
Attaching needed files to the machine
Here we are attaching the following files from the local machine to the EC2 instances:
- /etc/patroni-env: This file contains the environment variables that will be used by the Spilo container.
- /etc/ssl/etcd-certs/proventa-etcd-root-ca.pem: This file contains the root CA certificate of the etcd cluster.
- /etc/ssl/etcd-certs/proventa-etcd-gencert-config.json: This file contains the configuration for generating the client certificate for the Spilo container
- /etc/ssl/etcd-certs/proventa-etcd-root-ca-key.pem: This file contains the private key of the root CA certificate of the etcd cluster.
- /usr/local/bin/generate-client-cert.sh: This file contains the script that will be used to generate the client certificate for the Splio container.
This file contains the script that will be used to generate the client certificate for the Spilo container.
For more detailed information about the files, please visit our Github repository.
Creating the configuration for the Spilo container
Here we are creating a systemd unit file for the Spilo container. The unit file will be used to run the Spilo container as a systemd service. The unit file contains many attributes but let’s focus on the `podman` command executed in the `ExecStart` section. This command is used to run the Spilo container. The command has the following flags and arguments:
This is the path to the directory that will be used to store the data of the PostgreSQL cluster. By default the data is stored in "/home/postgres/pgdata" inside the container. We will mount this directory to the "$/patroni" directory on the host machine. Another use case where this can be useful is when you want to use an additional or external EBS volume to store the data of the PostgreSQL cluster. The volumes can then be configured so that the data is not lost when the EC2 instance is terminated.
This is the path to the directory that contains the certificates of the etcd cluster.
This is the name of the cluster. This name will be used to identify the Patroni cluster in the etcd cluster.
This is the version of PostgreSQL that will be used by the Spilo container.
This is the protocol that will be used to connect to the etcd cluster.
his is the list of etcd hosts that will be used by the Patroni cluster. The list of hosts is stored in the “ETCD_HOSTS” environment variable.
This is the path to the root CA certificate of the etcd cluster.
This is the path to the client certificate.
This is the path to the private key of the client certificate.
This is the name of the Spilo image that will be used to run the Spilo container. In this case we are using the spilo-15 image version 3.0-p1.
Notice that we are using “ETCD3” instead of “ETCD”. This is because our etcd cluster is using version 3 of the etcd API. However, if you are using an etcd cluster that is using version 2 of the etcd API, you should use “ETCD”.
Deploying the Patroni cluster on an EC2 instance
Now that we have configured the Butane file, we can use it to create an Ignition config. The Ignition config will be used to provision the EC2 instance that will run the Patroni cluster. To create the Ignition config, run the following command:
Before we can provision an EC2 instance for our Patroni cluster, we need to know what are the IP addresses of the etcd cluster. To get the IP addresses of the etcd cluster, we can run the following task inside an ansible playbook:
The “ip_addresses_template.j2” file contains the following:
The “ip_addresses_template.j2” file is a Jinja2 template that will be used to create the “patroni-env” file. The “patroni-env” file will contain the IP addresses of the etcd cluster which will be used to identify the etcd cluster. The “patroni-env” file contains the following:
Another thing to prepare is the security group that will be used by the EC2 instance. The security group should allow the following inbound traffic:
We can take the following ansible task to provision a security group for the Patroni cluster:
Now that we have the IP addresses of the etcd cluster and the security group for the Patroni cluster, we can provision an EC2 instance for our Patroni cluster. To provision the EC2 instance, we can run the following task inside an ansible playbook:
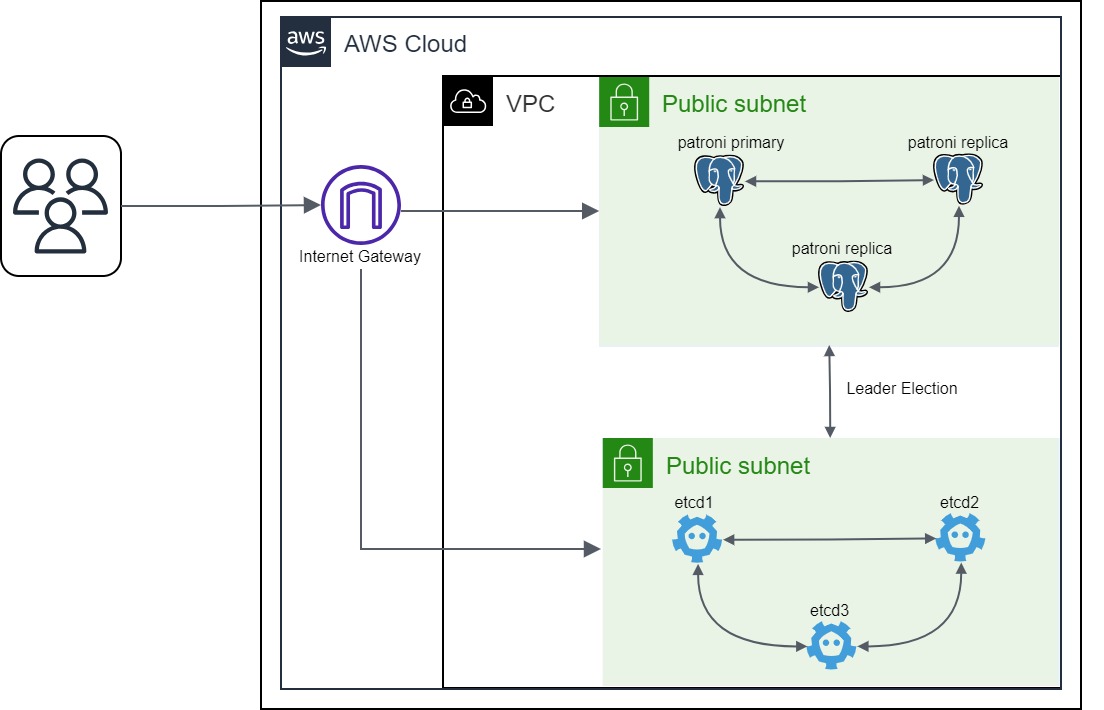
For the sake of simplicity, we are setting the security group to allow connections from anywhere on port 5432 so that we can connect to the PostgreSQL cluster from our local machine. Therefore, we are using a public subnet for the Patroni cluster. This is because we want to be able to connect to the PostgreSQL database from our local machine. In a real production environment, you would use a private subnet for the Patroni cluster.
Verifying the Patroni cluster
Now that we have provisioned the Patroni cluster, we can connect to it. To connect to the Patroni cluster, we can run the following command:
If the instance is just provisioned, it might take a few minutes for the machine to be ready to accept SSH connections and to start the Spilo container. So, please wait a few minutes.
Once you are connected to the EC2 instance, you can run the following command to check the status of the Spilo container:
If you can find a container running with the name “patroni-container”, then the Spilo container is running. Now, we can check the status of the Patroni cluster by running the following command:
The output should be similar to the following:
The output shows that we have a Patroni cluster with one master node and two replica nodes. The master node is running on node1 and the replica nodes are running on node2 and node3. The output also shows that the replication is working fine since the lag is 0.
Wrapping up
Congratulations! You’ve successfully set up a high-availability PostgreSQL with Patroni using Spilo image on AWS EC2 instances. Your PostgreSQL databases are now running in a fault-tolerant configuration. We hope this blog helps you in building reliable and highly available applications with PostgreSQL. Stay tune for the upcoming blog posts as we will explore more about load balancing and backups for PostgreSQL and… as always, stay curious and keep exploring the ever-evolving world of technology!

Farouq Abdurrahman ist Praktikant bei der Proventa GmbH und studiert Informatik. Sein Schwerpunkt liegt auf Cloud Computing. Er hat großes Interesse an der Digitalen Transformation und Cloud Computing. Aktuell beschäftigt er sich mit PostgreSQL Datenbanken in der Cloud.