In our previous blog posts, Setting up a highly available PostgreSQL Cluster with Patroni using Spilo Image, we embarked on a journey to set up a highly available PostgreSQL cluster managed by Patroni using the Spilo image. We saw how Patroni, in collaboration with an etcd cluster, elevates PostgreSQL to new heights of availability and failover automation. Building upon that, let’s explore the next chapter in our journey: backing up and restoring a highly available PostgreSQL cluster with a S3 bucket.
Why S3 bucket?
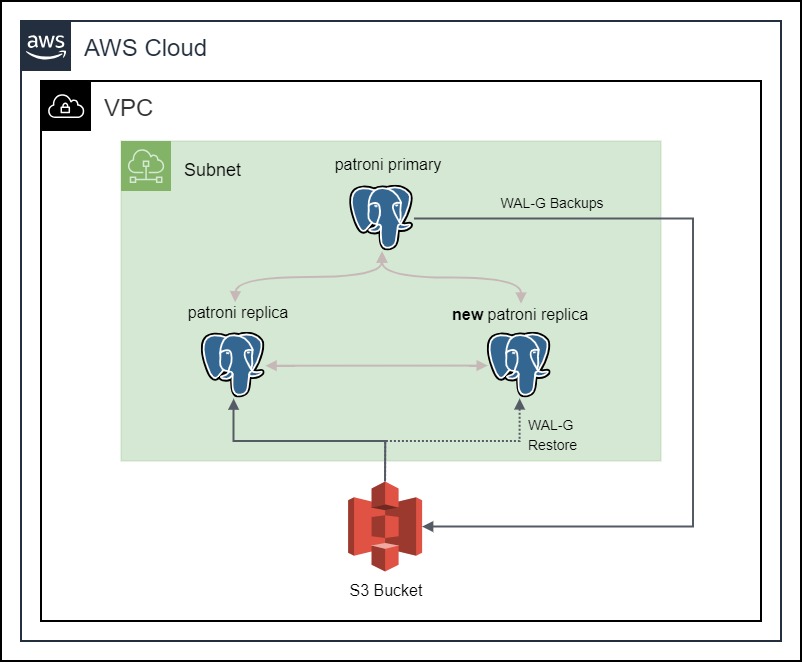
In a highly available PostgreSQL cluster, it is important to have a backup of the database. The backup can be used to restore the database in case of a disaster. The backup can also be used to create new replicas, instead of streaming the data directly from the primary node. This is useful when the primary node is under heavy load, and we want to create a new replica without affecting the performance of the primary node.
The backup can be stored in a file system or in a S3 bucket. The advantage of using a S3 bucket is that it is highly available and durable. According to the AWS documentation, the standard S3 bucket is designed to deliver 99.999999999% durability and 99.99% availability of objects over a given year. This means that the S3 bucket is highly available and durable. It is also easy to set up and configure, since Spilo provides a way to automatically create WAL-E / WAL-G backups and store them in a S3 bucket. We will be using this feature to store the backups in a S3 bucket.
Setting up the S3 Bucket
Now let’s see how we can set up a S3 bucket for our PostgreSQL cluster.
The first step is to create a new S3 Bucket. Let’s name it `patroni-demo-bucket`. We can use the following Ansible task to create the S3 Bucket:
The next step is to create a new IAM Role that will be used by the EC2 instances running the Spilo image to access the S3 bucket. The IAM Role should have specific permissions to access the S3 bucket. We can use the following Ansible task to create the IAM Role and its permissions:
Notice that we are using the assume_role_policy_document parameter to specify on which resources the IAM Role can be assumed. In our case, we will be using the EC2 instances running the Spilo image. We are also using the policy_json parameter to specify the permissions that the IAM Role will have. In our case, we will be using the permissions provided by the patroni-wal-role-policy.json file. The permissions in the file are the minimum permissions required to access the S3 bucket. Here are the links to the details of the assume_role_policy_document and the patroni-wal-role-policy.json.
After that we can use the Instance Profile to assign the IAM Role to the EC2 instances running the Spilo image. We can take the Start Fedora CoreOS instances task from the previous blog and update it to assign the IAM Role to the EC2 instances. Here is how the updated task should look like:
Putting the S3 Bucket and Spilo Together
Now, let’s see how we can put the S3 bucket and Spilo together. We can take the systemd unit file from the previous blog post and modify it to include the S3 bucket. The modified systemd unit file should look like this:
We are specifying the AWS_REGION, WAL_S3_BUCKET, and AWS_ROLE_ARN environment variables. The AWS_REGION environment variable specifies the region in which the S3 bucket is located. The WAL_S3_BUCKET environment variable specifies the name of the S3 bucket. The AWS_ROLE_ARN environment variable specifies the ARN of the IAM Role. The IAM Role will be used by the EC2 instances running the Spilo image to access the S3 bucket.
After that, we can just run the Ansible script again to provision the EC2 instances that will be running the Spilo Image. It will automatically create WAL-G backups and store them in the S3 bucket. Let the Spilo image run for a few minutes and then we can check if the backups are being stored in the S3 bucket.
Verifying the WAL backups on the S3 Bucket
Now, let’s check if the backups are actually being stored in the S3 bucket. We can do so by navigating to the S3 Bucket section in the AWS console and selecting the patroni-demo-bucket S3 bucket. We should see a new folder called spilo in the S3 bucket. The folder should contain a folder with the name of our Patroni cluster and inside that folder, we should see the WAL-G backups.
We can also check it with the AWS CLI by running the following command on our terminal:
The output should look like this:
With that we can see that the backups are being stored in the S3 bucket.
Wrapping Up
We have explored the process of creating backups for a highly available PostgreSQL cluster using a S3 bucket. This method offers the advantage of ensuring high availability and durability of backups. We’ve covered the steps for setting up the S3 bucket, creating an IAM Role with the necessary permissions, and integrating it with the Spilo image.
By following these steps, you can confidently secure your PostgreSQL data and be prepared for disaster recovery scenarios. Storing backups in a S3 bucket provides a reliable and robust solution to safeguard your critical database data. We hope this guide has been informative and assists you in implementing effective backup strategies for your PostgreSQL cluster.

Farouq Abdurrahman ist Praktikant bei der Proventa GmbH und studiert Informatik. Sein Schwerpunkt liegt auf Cloud Computing. Er hat großes Interesse an der Digitalen Transformation und Cloud Computing. Aktuell beschäftigt er sich mit PostgreSQL Datenbanken in der Cloud.