In our previous blog posts, we explored how to create a strong and reliable PostgreSQL cluster using Patroni and the Spilo container image. We also covered topics like connection pooling for PostgreSQL and the use of S3 buckets for backup and recovery, all of which boosted PostgreSQL’s reliability and availability. Now, as we move forward, let’s dive into the next part of our journey: Load Balancing.
Why Load Balancing?

In a highly available PostgreSQL cluster, load balancing is a must-have feature. There are many ways on how we can take advantage of the load balancer.
One option is to distribute the traffic across the cluster nodes. The load balancer can be configured so that it distributes read traffic across all the nodes in the cluster and write traffic to the primary node.
However, in our case, we will be using the replicas as standby replicas, not active replicas. This means that the replicas will not be used for any incoming requests but rather as a failover node in case the primary node goes down.
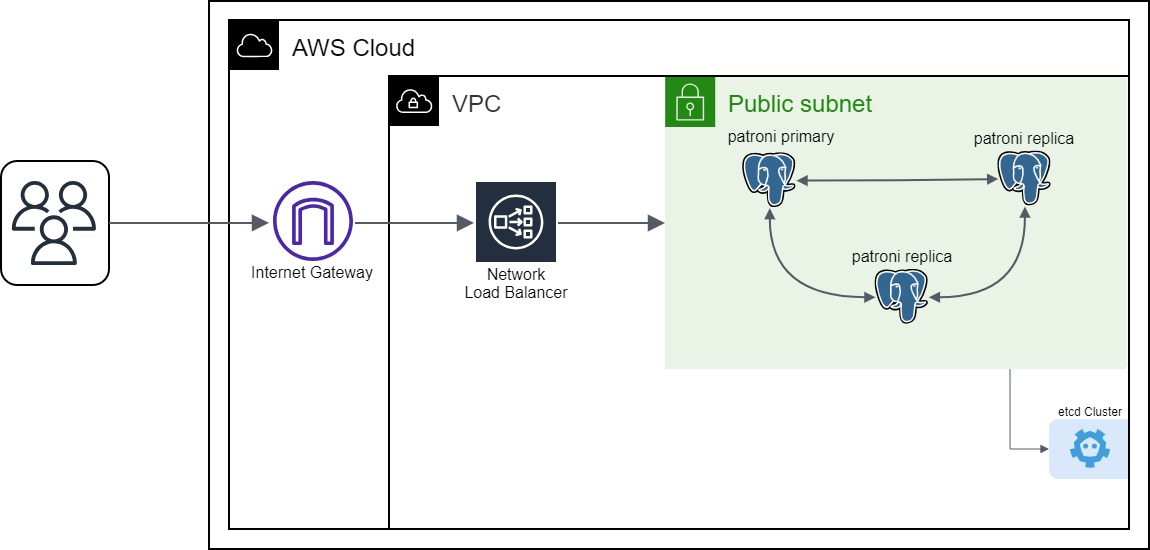
So, the other option is to use the load balancer to determine the primary node, to which the incoming requests can be routed. If the primary node fails, the load balancer can automatically decide which node is the new primary and route the requests to that node. This is the approach we will be using.
Setting up the Load Balancer
Now let’s see how we can set up a load balancer for our PostgreSQL cluster. We will be using the AWS Network Load Balancer for this purpose.
The first step is to create a new Target Group. The Target Group is a group of instances that will receive traffic from the load balancer. In our case, the Target Group will contain the instances of our PostgreSQL cluster. We will create a new Target Group called patroni-tg and add the instances of our PostgreSQL cluster to it. We can use the following Ansible task to create the Target Group:
In the health_check_port parameter, we specify the port on which the health check will be performed. In our case, we will be using the health check endpoint provided by Patroni. The health check endpoint is available on port 8008. The successful_response_codes parameter specifies the response codes that are considered successful. In our case, we will only forward the traffic to the primary node, so we will only consider the response code 200 as successful. The replica nodes will return the response code 503, which means that the node is not available to receive traffic.
Keep in mind that in this case we are using HTTP as the health check protocol, since the health check endpoint provided by Patroni is an HTTP endpoint. If you are using HTTPS as the health check protocol, you should also specify HTTPS in the health_check_protocol parameter.
The next step is to create a new Load Balancer. We will create a new Load Balancer called patroni-nlb and add the Target Group patroni-tg to it. We can use the following Ansible task to create the Load Balancer:
In the subnets parameter, we specify the subnets in which the load balancer will be created. In our case, we will be using the subnet in which our PostgreSQL cluster is running. In the listeners parameter, we specify the port on which the load balancer will listen for incoming requests. In our case, we will be using port 6432, which is the port for the PgBouncer. We also specify the Target Group that will receive the incoming requests. In our case, we will be using the Target Group patroni-tg that we created in the previous step.
The load balancer will be assigned with a DNS name. Since we are assigning the load balancer in a public subnet, the DNS name will be publicly accessible. We can use the DNS name to connect to the PostgreSQL cluster (through the PgBouncer). To get the DNS name of the load balancer, we can navigate to the AWS console and select the load balancer or we can use the following command on your terminal:
The output should look like this:
Now, we can connect to the Postgres database through the PgBouncer using postgres as the username and zalando (default password) as the password by running the following command:
After entering the correct password, you will be connected to the PostgreSQL cluster:
Wrapping Up
To sum it up, we have successfully set up a load balancer for our PostgreSQL cluster. Our approach focuses on using a network load balancer, which automatically manages traffic routing. This enhances your cluster’s resilience, allowing it to handle traffic even if one node faces issues. We have also seen how we can use the load balancer to connect to the PostgreSQL cluster. Now your PostgreSQL cluster is well-prepared for any challenges that may arise. Thanks for joining us on this journey, and we hope you’ve found our blog posts helpful!

Farouq Abdurrahman ist Praktikant bei der Proventa GmbH und studiert Informatik. Sein Schwerpunkt liegt auf Cloud Computing. Er hat großes Interesse an der Digitalen Transformation und Cloud Computing. Aktuell beschäftigt er sich mit PostgreSQL Datenbanken in der Cloud.